Microsoft “PowerShell” comes with Windows and provides a way to administer virtually everything from a command line. If you’ve ever heard of the DOS Command window, well, PowerShell replaces that.
PS Framework
As of the writing of this document (Feb 2019), the current stable version of PowerShell is 6.1.1. PowerShell version 1.0 was first introduced in 2006. PowerShell 5 was released in 2016. PowerShell Core Version 6 is cross-platform and open source. Therefore, PowerShell 6 will run on macOS and Linux. With each new version comes new capabilities.
PS Version
Enter the following command into PowerShell (PS) to get the installed version: (To access the PowerShell app on Windows, hold down the Windows key and the letter x, then find PowerShell on the menu.)
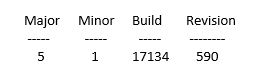
PS C:\$psversiontable.PSVersion
This returns something like the following object:
Modules
PowerShell offers extensions to its capability, otherwise known as modules. To see a list of all the modules currently available on your computer, enter the following:
PS C:>Get-module -ListAvailable
One of the most common modules available on larger networks is the Active Directory module.
Common Device Interface
Microsoft is trying to reduce the cost of running data centers by using automation built with common standards. One of the groups responsible for developing these standards is the Distributed Management Task Force (DMTF).
The CIM and WMI models are standard frameworks used by PowerShell to allow IT professionals to interact with hardware.
CIM
Common Information Model (CIM) is the DMTF standard for describing the structure and behavior of managed resources such as storage, network, or software components. For example, to get the available hard drive space using PowerShell, enter the following:
PS C:>Get-CimInstance -ClassName Win32_LogicalDisk -Filter "DriveType=3"
WMI
Windows Management Instrumentation (WMI) is a CIM server that implements the CIM standard on Windows. Or put another way, Windows currently implements the CIM standard using WMI.
Summary
PowerShell is a great framework, enabling you to get things done efficiently.
Language Principles
Like other shells and/or programming languages, PowerShell has a special syntax. PowerShell executes commands directly on the command line. However, it is much more effective to run these commands via script files. PowerShell script files have an extension of .ps1
To really get the full potential of PowerShell, one must understand programming fundamentals. I’ve included a few of the basics here. Programming is a very broad topic and my time is always in short supply. The coverage I can include in these pages barely scratches the surface.
Comments
No modern programming language would be complete without the ability to add comments. Comments allow script writers the ability to add notes which are not compiled or processed by the computer. The notes are for the developer and generally explain what the code or function is doing. PowerShell Comments are entered as follows:
# This is a single line comment. It begins with a pound or number sign.
<#
     This is a multi-line comment.
     Nothing within these brackets will be compiled.
 #>
Variables
Considering that computers consist mostly of circuits which contain no real brain power, every programming language supports variables. Variables are the way programmers store information for a running program. PowerShell variables are preceded with a $ sign. For example,
PS C:>$thisVariable = ‘hello world’
PS C:>Write-Host $thisVariable   # returns hello world
Arrays
Arrays are also available in every modern programming language. They provide a way of storing a collection of items. In other words, more than 1 item may be stored and used for later reference. Each item in an array is commonly referred to as an element. Each element in an array is positioned one after the other beginning with a zero (kind of like a Pez candy dispenser). For example, the first element is [0], the second is [1], etc. There is more than 1 way to create an array in PowerShell. Here’s an example,
PS C:>$myArray = @(‘hello’,’world’)
The example above creates a new array and stores a reference to it in the $myArray variable. This array contains 2 elements. The first element is ‘hello’. The second one is ‘world’. The elements are separated by a comma. Use the variable to access the array. For example, if you want to do something with the second element, you could use the following:
PS C:>Write-Host $myArray[1] # returns world
Objects
Objects are an abstract way to process complex data. Objects are best understood using real world things. In fact, Object Oriented Programming or OOP was designed so that programmers could develop programs using abstract concepts from the real-world. For example, let’s say we’re developing a game that has animals. In this case, we want an animal object that has its own properties and does certain things. In fact, let’s say we want multiple animal objects with their own unique properties and behaviors. We could start with a dog. Each dog object has properties of hair color, name, number of legs, etc. Also, each dog has things it does such as bark, and walk. In the real-world, every object is derived from a class. In my example here, a dog object is part of the Animal class. A cat object is also a part of the Animal class. In programming, every object comes from a class. The classes included with PowerShell are designed by Microsoft to define real-world computer objects. For example, a computer object may have a name, a processor type, a memory, etc. PowerShell returns data as objects. Each of these objects has its own properties.
Conditionals
I’m sure you’ve heard that all computers think in terms of 1’s and 0’s. This is “true” with conditionals. (pun intended) Conditionals are found in every programming language. This is where a phrase is processed by a computer to determine if a statement is “true” or “false.” If a statement is “true”, specific code is run. Otherwise, if it’s “false”, a different set of code is run.
Loops
Loops are used to process items in memory. For example, looping through an array to evaluate the items in each element.
Methods
Methods are behaviors that objects do. For example, using the Animal Class I described above, a dog bark is a behavior. A cat meowing is another behavior. In PowerShell, objects have their own methods, or things they do. For example, an array object can count the number of items stored in itself. Using a method is normally done by appending the method name to the object name using the dot notation. Here is an example of using a PowerShell array method named (length).
PS C:\>$myArray = @(‘hello’,’world’)
PS C:\>Write-Host $myArray.length   # returns 2
Active Directory
Active Directory is at the core of any large network built on the Microsoft framework. So it makes sense that it’s tightly integrated with PowerShell. Active Directory is no different than most large-scale warehouse databases. It is designed to handle thousands of queries every second, by thousands of clients, every day.
There are thousands of books written on the subject of database query optimization. These books will tell you that before you begin writing any queries, you must understand the database structure—its design, also known as its schema. This tells you first and foremost, what information you can get out of it. Once you know what data you can retrieve and what data you want, you can drill down to the most specific query possible. It’s important to narrow down a query first, prior to running it. This helps prevent excessive bandwidth on a network, and unnecessary data from being downloaded to your computer.
let’s say we have a database that stores information about an organization which spans the globe. We’ve organized the information into containers that represent real-world objects. We have people organized by country, state, city, and building number. If we are designing a query to retrieve the people’s last names who happen to be in our building, we would narrow down the query to specifically ask for only our building number. In other words, we would ask the database something like the following: For every person in our building number, give us the last names. First of all, this gives us what we want. Secondly, it’s more efficient because it tells the database where to start looking. It would be less efficient to ask the database to start looking in the state. It’s best practice to optimize your query down to the specific data set you want when using Active directory.
Using PowerShell
Now that I’ve briefly gone over some basics. I’m going to dive into using PS.
Default Path
When using PowerShell, we normally run files, otherwise known as scripts, from the working directory. The working directory is seen at the PowerShell command prompt. For example:
PS C:\Users\userprofile>_In the path above, PowerShell is ready to run scripts in the user’s profile directory. PowerShell scripts can be run from this directory by entering the following:
PS C:\Users\userprofile>.\name-of-file.ps1The period and backslash .\ characters tell PowerShell to run a file in the current working directory.
PowerShell will run the script with the permissions of the user running the script. To run a script with admin privileges, run the Admin version of PowerShell.
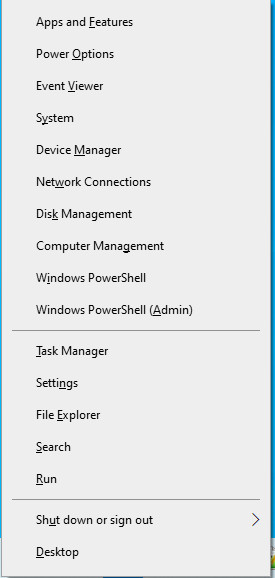
(For example, holding the Windows-X key combination , you see the menu above.)
PS Profile
PowerShell loads a profile every time it launches. The working directory of PowerShell can be changed at any time by entering CD into the command line. However, using your profile, you can specify this directory. For example:
Entering $profile into the command line shows you the location of your local profile.
PS C:\>$profile
To create and edit your profile, enter the following 2 commands into the command line:
PS C:\>New-Item -Path $PROFILE -ItemType file –Force
PS C:\>Notepad $profile
The first command above creates a file and the second command opens the file in Notepad for editing.
To customize the directory where PowerShell starts, enter a path most convenient for you. Save the file. For example:
CD C:\Wherever\you\want\Close PowerShell and reopen it. Notice the command prompt begins where you specified. For example:
PS C:\Wherever\you\want>Now PowerShell scripts can be run from this directory by entering the following:
PS C:\Wherever\you\want>.\name-of-file.ps1Query Active Directory (AD)
PowerShell was designed by IT administrators for IT administrators. Active Directory is at the core of any Microsoft network and PowerShell integrates nicely. The following examples demonstrate how to query Active Directory.
Get Computer Info
Use the Get-ADComputer commandlet to get computer information. For example, to get the Location property of a computer enter the following:
PS C:\>Get-ADComputer -Identity "system name" -Properties Location
Replace the “system name” with your SamAccountName. The SamAccountName uniquely identifies every computer in the database. Also, Location is only 1 of the many computer properties stored in Active Directory.
Get User Info
Use the Get-ADUser commandlet to get user information. For example, to get the DisplayName property of a User enter the following:
PS C:\> Get-ADUser -Identity "user id" –Properties DisplayName
Replace the “user id” with your SamAccountName. The SamAccountName uniquely identifies every person in the database. DisplayName is only 1 of the many user properties stored in Active Directory.
Query Computer
The PowerShell command line can query local and remote computers more efficiently than logging into a computer remotely and/or using graphical dialogs.
Local Computer
Use Get-ItemProperty to query the local registry. To show all of the locally installed 32 Bit software using the local registry, enter the following:
Get-ItemProperty HKLM:\Software\Wow6432Node\Microsoft\Windows\CurrentVersion\Uninstall\* -Exclude RunspaceId | select-object -property @{n='Program';e={$_.DisplayName}}, @{n='Version';e={$_.DisplayVersion}}, InstallDate | Sort Program
Remote Computer
Use Invoke-Command to communicate remotely. To show all of the 32 Bit software installed on a remote computer, enter the following:
Invoke-Command -computername ‘SYSTEMNAME’ {Get-ItemProperty HKLM:\Software\Wow6432Node\Microsoft\Windows\CurrentVersion\Uninstall\* -Exclude RunspaceId | select-object -property @{n='Program';e={$_.DisplayName}}, @{n='Version';e={$_.DisplayVersion}}, InstallDate | Sort Program}
Printers
Use Get-Printer to see a list of printers. (I added a filter which filters out only printers with IP ports)
Get-Printer -computerName ' SYSTEMNAME ' | Where-Object {$_.PortName -like "*16*"} | Format-Table Name, PortName
Use Get-PrinterDriver to see a list of drivers. For example,
Get-PrinterDriver -ComputerName ‘SYSTEMNAME’ | FT -auto
Use Get-PrinterPort to see a list of printer ports. For example,
Get-PrinterPort -ComputerName ‘SYSTEMNAME’